Basic Image Editing for the Web
Posted on January 10th, 2012
This is a basic tutorial for people who need to add optimised images to their website.
This tutorial assumes that you have some photos on your computer ready to go – they may have been transferred from a digital camera or been scanned in from a photographic print.
Image Editing Software
There’s lots of free software out there for performing basic image editing tasks:
- Paint.Net – www.getpaint.net/ (used for the following examples)
- GIMP – www.gimp.org/
As well as paid software suites, that obviously come with more features:
- Adobe Fireworks – www.adobe.com/uk/products/fireworks.html (my favourite for simple image editing)
- Adobe Photoshop – www.adobe.com/uk/products/photoshop.html (the big boy)
For a full list, with supported features see this wikipedia page.
Step 1: What size should the image be?
Images from a fancy modern camera can be massive, especially if a raw or large setting is used. Not only is the file size many megabytes, but the dimensions of the image will be much larger than most peoples screen resolutions can display without zooming. Similarly scanned images are normally much larger than what is required for use on the web.
If you just want to add a general image to your website (such as on a blog post etc.) follow these general rules:
- Image resolution: 72dpi/ppi
- Image size: stick to a maximum of 1000 pixels wide or high (bare in mind people may be viewing on smaller devices such as iPads (1024×768), or netbooks)
- Jpeg Compression: when you go to export or save the image a general setting of 80% is usually ok for most situations.
Sizing to Specific Dimensions
In certain scenarios, you may need to resize an image to specific dimensions, this could be to match an existing series of images or replace a current one.
For this example we’ll assume we need to create an image that is 230px wide and 200px high.
Start by setting the canvas to that size, select File -> New:
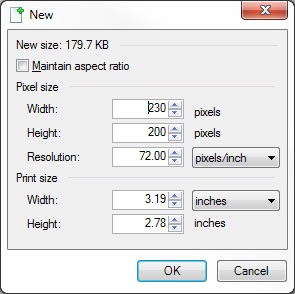
Also make sure you set the resolution to 72 pixels/inch.
This will then create a blank canvas that is the correct size:
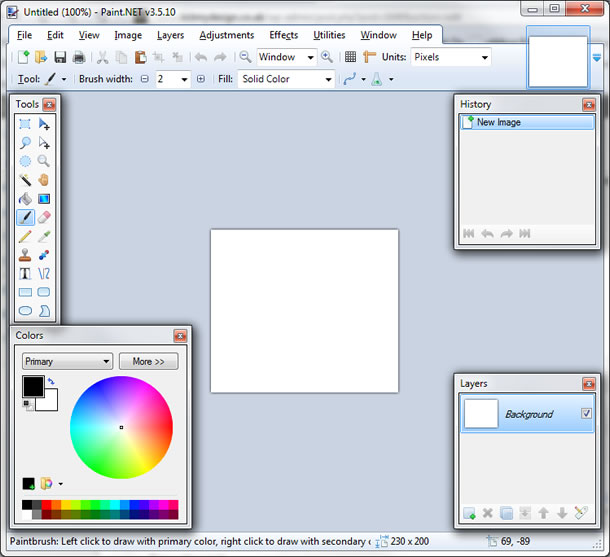
Next, select File -> Open and browse for the digital image file you wish to use. This will then open in a new window in Paint.Net.
From this new window select Edit -> Select All then Edit -> Copy – this copies the file contents.
Switch back to our blank canvas by clicking on the thumbnail in the top right. With the blank canvas once again showing, select Edit -> Paste (or Ctrl+v).
This then gives the following prompt:
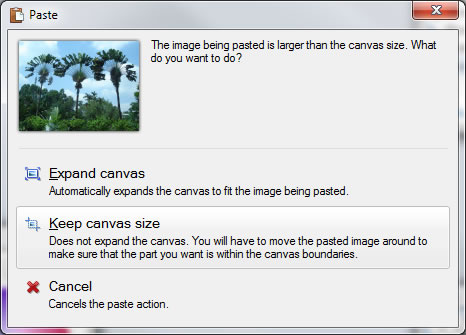
Select the second option – Keep canvas size. The new image will then be pasted in at it’s original (no doubt large) size, aligned top left.
The final step is to resize the image so that it fits the canvas.
Hold down the shift key on your keyboard and move the mouse cursor over the top left corner (it changes to a hand icon) then click the left mouse button (keep it held down) and drag the corner down and to the right and release.
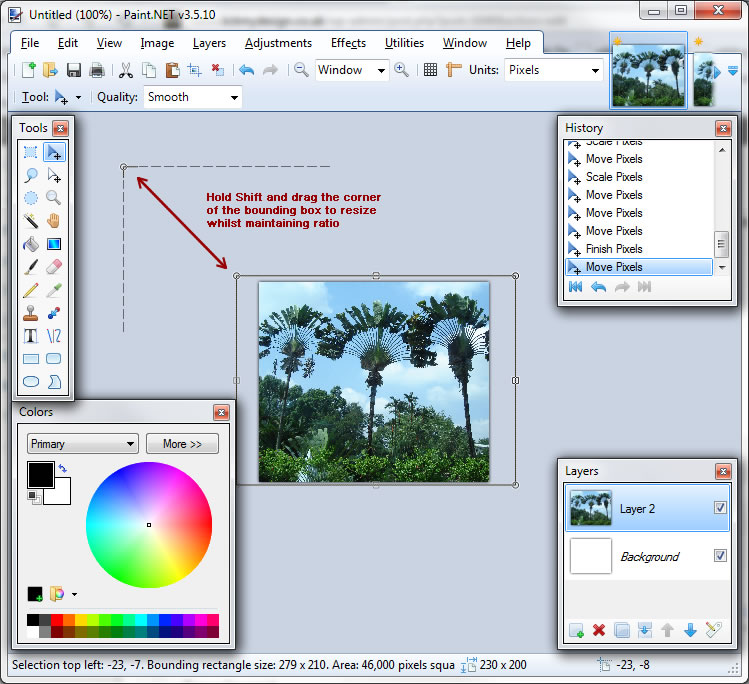
Note: holding down shift keeps the ratio locked when resizing, otherwise the image would get distorted.
This makes the image smaller, if it disappears off the bottom of the canvas, just click within the black outline of the image and drag it back to the canvas.
Repeat the resizing process until the canvas is filled, leave a few pixels overlapping the edges to ensure there’s no white space at the sides.
Step 2: Select a file format
The vast majority of images are normally in Jpeg format which strikes a good balance between file compression and image quality.
To decide reference this table:
| Image Type | File Format |
|---|---|
| Photograph | Jpeg |
| Image with gradients | Jpeg |
| Simple logo or text on a single colour background | Gif |
Step 3: Save the file
In Paint.Net select File -> Save As… locate where you want the file to be saved on your computer and in the Save as type dropdown; select JPEG.
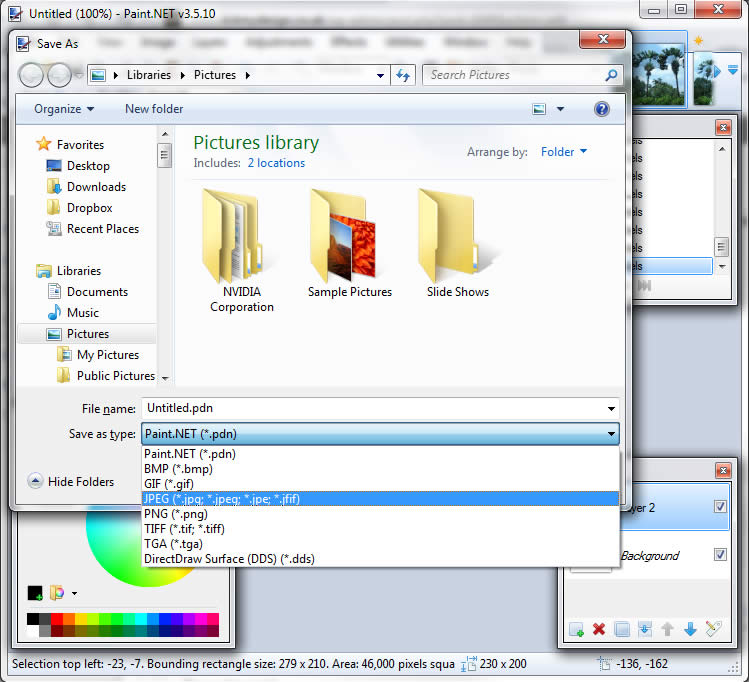
This will then open the Save Configuration window where you can adjust the jpeg compression settings and preview the results:
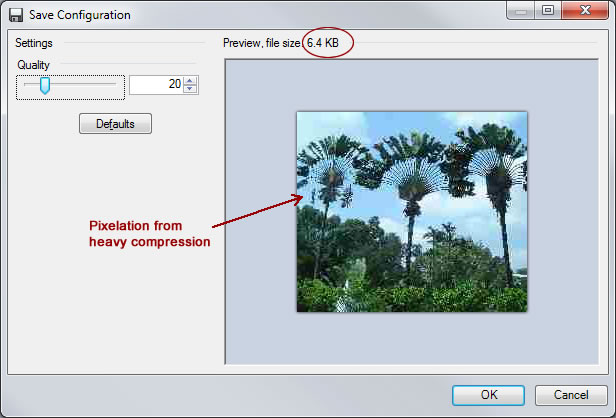
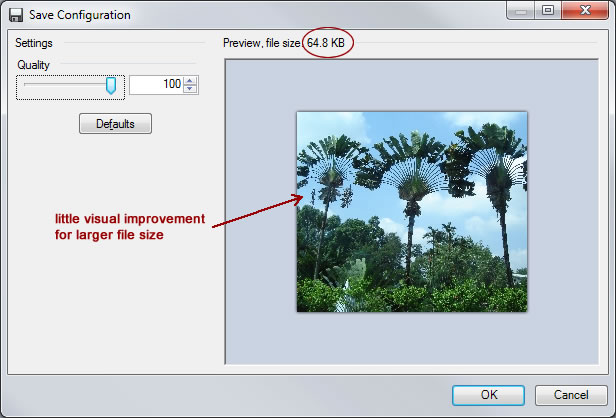
Changing the Quality slider adjusts the file size and image quality, too low as above and you will get a blurry pixelated photo. Too high a quality can result in a larger file size, but little visible improvement in quality, as below:
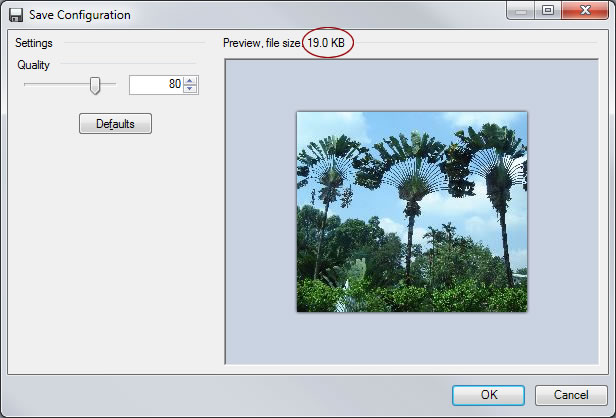
It’s best to strike a balance between file size and image quality, 80 gives an acceptable picture and a good file size:
Click OK to save the image and you’re done.